
Music is primarily an auditory art, which can leave teachers wondering how to best approach teaching students with hearing loss. Children and adults who are having severe to profound hearing loss often qualify for a surgical device – cochlear implants, a device that help deaf people hear. In this blog, we will share some key information and tips from our experiences on teaching students with cochlear implants.
When referring to music perception and cognition we usually consider three aspects: rhythm, pitch and timbre.
Rhythm: Rhythm is the easiest to access for children with cochlear implants. The cochlear implant devices are well suited for transmitting a basic beat or a melodic rhythm. Many CI users use rhythmic cues for melodic identification.
Pitch: CI students can hear the typical speech range of a female and male voice. However, CI students have increased difficulty with the perception and recognition of the pitch both within and beyond that range.
Timbre: Instruments like violin and flute are not as accessible as piano to CI students due to the high pitch range. The piano is considered to be the most accessible instrument due to its pitch range and nature of its timbre. Other instruments like cello, viola, trumpet, saxophone, and drums are also accessible. The most positive music learning experiences come from us–music teachers–who can skillfully adapt and implement above mentioned teaching aspects.
Here are a few practical adaptations that we would like to share:
1- Adjusting music to the range that is hearing accessible
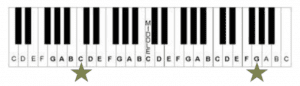
This image demonstrates the range that a student with CI is able to hear. It is so important to keep this in mind when you are choosing pieces or activities for your students to ensure they are hearing accessible.
2- Multi-Sensory Approach
Use a multi-sensory approach with a combination of visual (pointing to the music score where finger numbers were written), aural (singing the melody, words, or finger numbers, listening to a recording of the piece), tactile (touching fingers while singing the numbers), and directional (using hand and body signals indicating music direction – up and down).
3- Listen to the Student’s Feedback
Always watch your student and observe reactions. Often they will give a physical cue of comfort and/or discomfort of the task or sound they are experiencing. You can also ask the student about their experience and adjust your teaching strategies accordingly.
4- Switch Activities
Plan to switch the music activities within 5-7 min. Sandwich them! Difficult, easy, difficult, easy etc. Keep activities interesting and varied to sustain interest.
5- Clear practice instructions
Always be clear in your practicing expectations. Detailed written instructions that are clearly communicated are essential. You can provide a detailed practicing plan or a checklist that will help the student when practising at home.
6- Establish strong communication with caregivers
An important key to your success: caregivers! They will be your right hand, your voice when you are not there. Establish a great rapport with them and it will make a world of a difference for you and your student.
7- Be creative and innovative
Every student is unique and needs an individualized teaching approach. What works for one student may not work for another. Be open to trying different techniques to personalize the learning experience. Whether using body percussion, singing, visuals, or colour coding, the possibilities are endless so keep exploring! Also, throughout the learning journey things will change, adjust
accordingly and enjoy the process!
8- Reach out for teacher support (ideas, suggestions, methods)
In studio teaching, we often get absorbed in our own bubble. It is important to keep in mind that there are many teachers out there who can provide feedback,
suggestions and support, so be sure to connect and communicate. There are many ways where you can connect with other teachers like music teachers’ groups on Facebook, training sessions, webinars, or teacher networks.
9- Have fun!
As much as possible try to include fun activities such as rhythm games, music and movement, freeze dance, music appreciation, art and music. Think of any other fun activity that can be used as a warm up, during breaks or between demanding tasks so the student stay engaged in the lesson. Creating a relaxed and positive environment not only increases motivation, it can also contribute to wellbeing. Have fun and enjoy making music together!
Happy teaching!


Created with